
Most cabin air filters can be swapped in under 15 minutes with no tools beyond a flashlight and maybe a screwdriver, and the part itself usually runs $10 to $50 depending on the filter type. If you’re noticing weak airflow, a musty smell, or slow-clearing windows, that’s your cue to act now. Check your owner’s manual or a parts lookup tool for your exact location and part number before you start.
TL;DR:
- Replacing the cabin air filter typically takes under 15 minutes and involves simple steps like vacuuming the housing and checking airflow direction.
- Using the correct filter size and type, such as activated carbon or HEPA, is essential for dealing with specific issues like odors or allergens.
- Signs of a clogged filter include weak airflow, musty smells, foggy windows, and increased cabin dust, alerting you when a replacement is needed.
- If replacing the filter does not improve symptoms or access is difficult, a professional inspection can identify hidden issues like mold, debris, or a failing blower motor.
- Shorter replacement intervals are advised for dusty roads, pollen seasons, or wildfire smoke, with visual checks providing quick assessments between scheduled changes.
Table of Contents
- Signs Your Cabin Air Filter Needs Replacing
- How Do You Replace a Cabin Air Filter?
- Which Cabin Air Filter Type Fits Your Needs?
- Did the Replacement Actually Fix the Problem?
- When Should You Let a Shop Handle It Instead?
- Get Your Cabin Air Filter Checked in Arlington
- Sources
- FAQ
Signs Your Cabin Air Filter Needs Replacing
Your cabin air filter is quietly doing a lot of work, straining pollen, dust, exhaust particles, and road grime out of the air blowing through your vents. When it gets clogged, it doesn’t fail quietly. It sends up a flare.
Watch for these symptoms:
- Weaker airflow from the vents, even on the highest fan setting
- A musty or moldy smell when the AC or heat kicks on
- Windows that fog up and take longer than usual to clear
- More dust settling on your dashboard than normal
- A louder, straining blower motor noise
Technicians consider this a safety item, not just a comfort upgrade, because a clogged filter can slow down your defroster right when you need clear visibility most, and that strain can eventually wear on the blower motor itself.
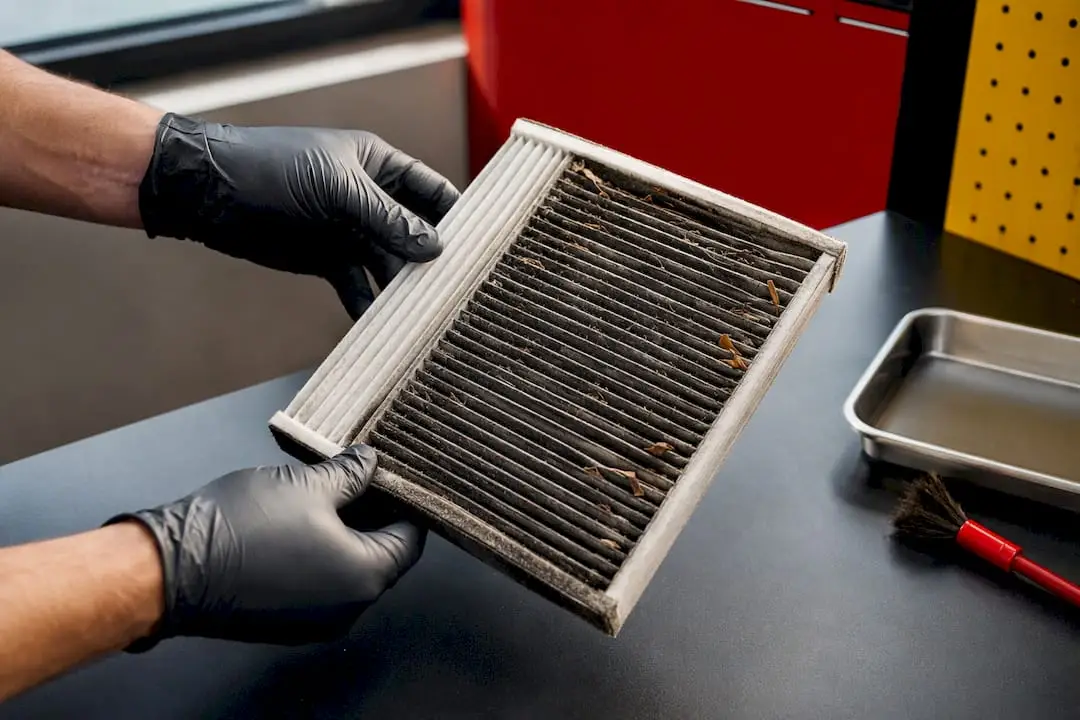
Baseline replacement interval: Manufacturers generally recommend changing your cabin air filter every 12,000 to 15,000 miles or once a year, whichever comes first. If you drive through construction zones, dusty rural roads, heavy pollen season, or areas affected by wildfire smoke, cut that interval shorter. Your owner’s manual is the real authority here since some manufacturers build in more conservative recommendations for tougher conditions. When in doubt, pull the filter and look at it. A quick visual check for gray discoloration, trapped debris, or a musty smell tells you almost everything you need to know.
How Do You Replace a Cabin Air Filter?
Before you touch a single clip, confirm two things: where your filter lives, and which part fits your car. Most vehicles hide it behind the glove box, tucked under the dash on the passenger side, or accessible near the base of the windshield in the engine bay. A quick search by your year, make, and model, or the OEM part number printed in your manual, saves you from buying the wrong filter twice.
You won’t need a full toolbox for this job. A flashlight, a pair of gloves, and a small screwdriver cover almost every situation. Many designs require no tools, relying on simple tabs and clips instead.
Here’s the general sequence:
- Locate the housing. Open the glove box and empty it out, or find the cover panel under the dash or near the windshield base.
- Release the glove box (if applicable). Squeeze the side stops or remove the retaining screws so the box swings down fully, exposing the filter housing behind it.
- Open the housing cover. Unclip or unscrew the access panel. Go slow here. Plastic tabs are the most commonly broken part in this whole job.
- Pull the old filter out. Note which direction it was facing before you remove it. Most filters have an airflow arrow printed on the frame.
- Vacuum the housing. Leaves, debris, and dust build up in the cavity even when the filter is doing its job. A quick pass with a shop vac or a soft brush clears it out.
- Insert the new filter. Match the airflow arrow to the same direction as the old one. Getting this backward is one of the most common mistakes, and it can reduce filtration efficiency or even cause the filter to collapse under airflow pressure.
- Reassemble. Snap the housing cover back into place, reattach the glove box, and reload it.
Layouts vary more than you’d expect. Some cars hide the filter behind trim panels that need to come off first, and a handful require reaching in from the engine bay near the cowl. If your housing looks buried under wiring harnesses or requires removing more than one panel, that’s a sign to slow down rather than force anything.
Pro Tip: Take a photo of the old filter’s orientation with your phone before you pull it out. It takes two seconds and eliminates all guesswork when you’re holding the new one and can’t remember which way the arrow pointed.
The whole process typically takes under 15 minutes once you know where to look; for example, mobile mechanic services can handle filter replacement quickly and conveniently if you prefer professional help at your location. The mistakes that turn a quick job into a frustrating one are almost always the same three: installing the filter backward, forcing a filter that’s slightly the wrong size, and leaving debris in the housing that immediately dirties the new filter.
Which Cabin Air Filter Type Fits Your Needs?
Not every cabin air filter does the same job, and picking the right one comes down to what’s actually bothering you.
- Basic paper filters handle dust, pollen, and larger particulates. They’re the cheapest option and work fine for most drivers in average conditions.
- Activated carbon filters add a layer that helps absorb odors and VOCs, useful if you drive near industrial areas, through traffic-heavy corridors, or just hate that exhaust smell leaking into the cabin.
- HEPA-style filters target the finest particulates, the kind that trigger allergies or asthma. Filter media ranges widely in what it can trap, and premium options cost more because they’re doing more.
If you deal with seasonal allergies, live somewhere prone to wildfire smoke, or commute through heavy pollution, spending a bit more on carbon or HEPA media is worth it. For everyone else, a quality paper filter does the job.
Fitment matters more than people assume. A filter that’s slightly undersized lets unfiltered air bypass it entirely, defeating the purpose. Stick with OEM-specified sizes, whether you buy from the dealer, a trusted auto parts store, or a reputable online retailer.
Did the Replacement Actually Fix the Problem?
Once the new filter is in, run a few quick checks. Turn the fan to its highest setting and confirm airflow feels noticeably stronger than before. Run the AC or heat for a few minutes and see if that musty smell is gone. Then test the defroster and see if the windshield clears faster than it did last week.
If symptoms stick around, a few culprits are worth ruling out:
- Debris or a nest still sitting in the housing (squirrels and leaves love this spot)
- A blocked intake grille under the cowl, since airflow can stay weak even with a fresh filter installed if the intake path itself is clogged
- The new filter installed backward
- A blower motor that’s struggling independent of the filter
| Symptom after replacement | Likely cause | Next step |
|---|---|---|
| Airflow still weak | Blocked cowl intake or backward filter | Recheck orientation, inspect intake grille |
| Musty smell persists | Mold in ducts or evaporator | Professional AC disinfecting |
| Blower makes noise or won’t run | Motor strain or failure | Shop diagnostic |
A persistent moldy smell after a clean filter swap usually means the contamination has spread into the ductwork itself, and that’s not something a new filter alone will solve.
When Should You Let a Shop Handle It Instead?
I’ll be straight with you: this is one of the most DIY-friendly jobs on any car, and I’d never tell you to pay someone for a 15-minute task you can do with a flashlight and ten minutes of patience. But there are real situations where calling a shop is the smarter move, not the lazy one.
If your housing requires pulling trim panels or reaching in from the engine bay, or you’re finding broken clips you can’t source easily, stop before you make it worse. The same applies to persistent musty odors after a fresh filter, which often point to mold in the ductwork rather than the filter itself, and to blower motors that sound like they’re straining even with clean airflow.
That’s where a shop earns its keep. Expresslubearlington’s technicians are ASE-certified, meaning they’ve passed the industry’s standard competency exams, and the shop is a RepairPal Certified location and a CarFax Top-Rated Service Center. Every job comes backed by a 24-month/24,000-mile warranty, and a digital vehicle inspection documents exactly what’s wrong before any work starts, so you’re never guessing what you’re paying for.
— Hassan
Get Your Cabin Air Filter Checked in Arlington
If your filter housing is hiding behind trim you don’t want to fight with, or that musty smell won’t quit no matter what you try, Expresslubearlington gets you back to clean airflow without the trial and error. Our ASE-certified technicians handle it as part of a full digital vehicle inspection, so you’ll know exactly what’s going on with your air conditioning and ductwork, not just the filter.
We’re a RepairPal Certified shop and a CarFax Top-Rated Service Center, and every repair comes with a 24-month/24,000-mile warranty for peace of mind. If a bigger repair pops up unexpectedly, we also offer financing options so you’re not stuck choosing between your car and your budget. Stop by or book your service today and let us handle the parts of the job that aren’t worth wrestling with yourself.
Sources
- What Happens If You Never Replace Your Cabin Air Filter? — Filterbuy
- What Happens If You Don’t Replace Your Car’s Cabin Air Filter? — SlashGear
- Cabin air filter: What happens if I never replace it — Motor1
- Cabin air filter — RepairPal
FAQ
How often should you change your cabin air filter?
Most manufacturers recommend replacing it every 12,000 to 15,000 miles or once a year, whichever comes first, with shorter intervals if you drive in dusty, high-pollen, or smoky conditions.
Can you replace a cabin air filter yourself?
Yes. Most vehicles let you access the housing behind the glove box or under the dash, and the swap typically takes under 15 minutes with little or no tools required.
What are the signs of a bad cabin air filter?
Common symptoms include reduced airflow, musty odors, slow-clearing windows, and excess dust inside the cabin.
What happens if you don’t change the cabin air filter?
Airflow weakens, odors build up, and a clogged filter can impair your defroster and strain the blower motor, which can lead to bigger repair costs down the road. If the housing is hard to reach or the smell won’t clear, Expresslubearlington can inspect it as part of a full service visit.