
Brake pad replacement is a job most competent DIYers can handle safely on mainstream vehicles — but only when it’s a straightforward pads-only swap, you have the right tools, and you’re comfortable working under a properly supported vehicle. Parts alone run $25–$120 per axle depending on material, while a professional installed job typically lands between $150–$300 per axle at an independent shop. If you’re unsure about any step, or if your car has ABS complications, electronic parking brakes, or rotors that feel rough, skip the driveway and book an ASE-certified shop. The savings aren’t worth a brake failure.
Key Takeaways
Safe brake pad replacement comes down to one decision: whether the job is a straightforward pads-only swap you can handle with the right tools, or a complex repair that needs ASE-certified hands.
| Point | Details |
|---|---|
| DIY cost savings | Parts run $25–$120 per axle; professional installed jobs average $150–$300 per axle at independent shops. |
| Know the warning signs | Grinding, pulling, and a sinking pedal demand immediate attention; squealing means schedule within the week. |
| Rotors change everything | A pads-plus-rotors job runs $300–$600 per axle; always get rotor thickness measured before deciding. |
| Choose your pad material | Organic for quiet/budget, semi-metallic for durability, ceramic for low dust and long life. |
| Express Lube & Car Care | ASE-certified brake service in Arlington with a 24-month/24,000-mile warranty and $20 off brake services. |
Table of Contents
- What are the signs your brake pads are worn out?
- How much does brake pad replacement actually cost?
- How to replace brake pads safely: a step-by-step DIY checklist
- When do rotors need resurfacing or replacement?
- Which brake pad material is right for your car?
- When should you hire an ASE-certified shop instead of doing it yourself?
- Common DIY mistakes and how to fix them after the job
- What Express Lube & Car Care offers for brake-pad replacement
- My honest take on DIY vs. professional brake work
- Schedule your brake inspection at Express Lube & Car Care
- Sources
- FAQ
What are the signs your brake pads are worn out?
Your brakes are rarely subtle when something’s wrong. They send up flares — you just need to know how to read them. GEICO’s maintenance guide identifies five clear warning signs, and knowing which ones demand immediate action versus a same-week appointment can save you from a much bigger repair bill.
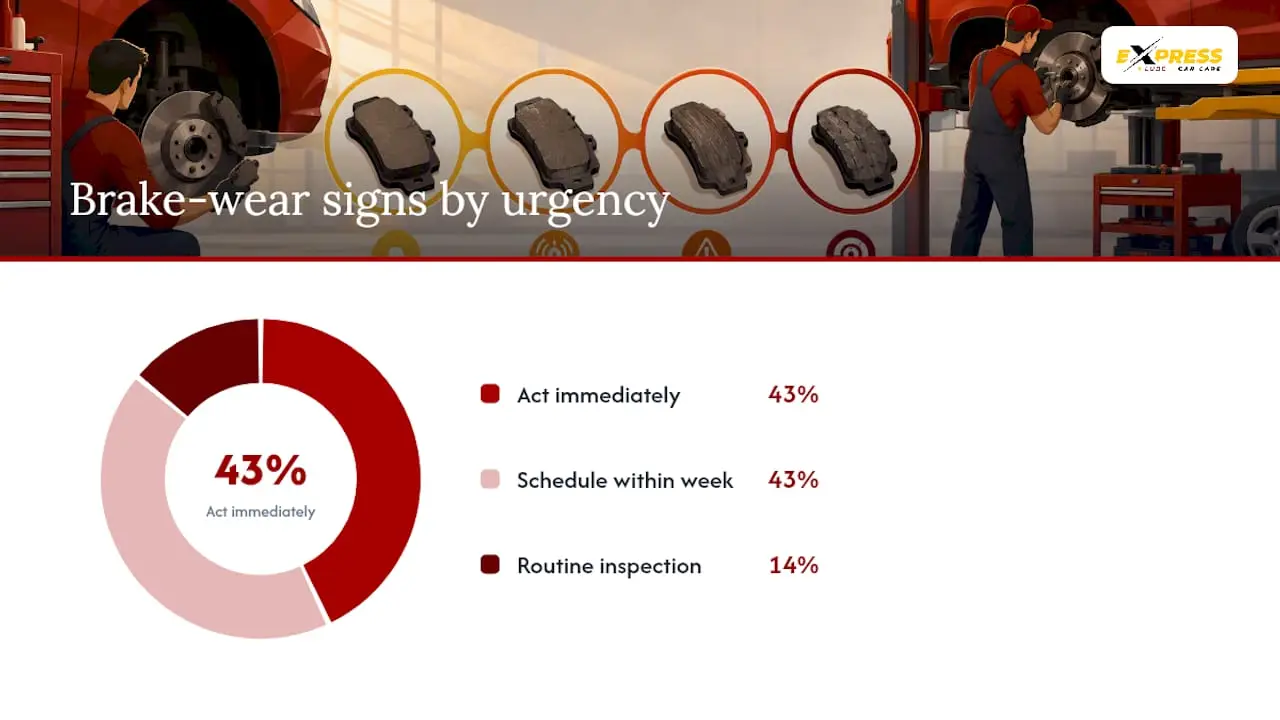
Act immediately (don’t drive further than necessary):
- Metal-on-metal grinding: The pad material is gone. You’re destroying your rotors with every stop.
- Vehicle pulling hard to one side: A seized caliper or severely uneven pad wear is affecting your steering control.
- Brake pedal sinking toward the floor: Possible fluid leak or master cylinder issue — not a pad problem alone.
Schedule within the week:
- Persistent high-pitched squeal: The wear-indicator tab is contacting the rotor. This is exactly what it’s designed to do — alert you before damage occurs.
- Vibration through the pedal or steering wheel: Often signals warped rotors alongside worn pads.
- Longer stopping distances: Your pads have lost friction material and stopping power is genuinely reduced.
Routine inspection trigger:
- Dashboard brake warning light: Could be a pad sensor, low fluid, or a system fault. Get it read with a scan tool.
Pro Tip: Not every brake noise means worn pads. Surface rust builds overnight on rotors that sit in rain or humidity, and it can create a brief grinding or scraping sound for the first few stops of the day. If the noise clears after a mile and your pedal feels normal, it’s likely surface rust burning off. Persistent noise — especially after the car warms up — needs a diagnostic.
Most manufacturers recommend inspecting your brakes at least twice a year, or whenever you rotate your tires. Catching wear early is the difference between a pad swap and a full brake job.
How much does brake pad replacement actually cost?
The honest answer: it depends on your vehicle, the pad material, and whether your rotors need attention. Here’s a clear breakdown so you can read any quote with confidence.
| Pad Material | Parts Only (per axle) | Installed at Independent Shop |
|---|---|---|
| Organic | $25–$50 | $150–$200 |
| Semi-metallic | $40–$70 | $40–$70 |
| Ceramic | $60–$120 | $200–$300 |
Sources: UseCalcPro; KBB
RepairPal’s estimator puts the average total brake pad job between $330 and $390, with labor running $122–$179 and parts around $208–$211 per job. That’s a full-service shop average across vehicle types and locations — your actual quote may land higher or lower.
What pushes the price up:
- Rotor resurfacing or replacement adds $150–$300+ per axle
- Luxury or European vehicles carry higher parts costs and sometimes require dealer-level tools
- Hardware kits (clips, pins, anti-squeal shims) add $15–$40 but are worth including
- Dealer shops typically charge 20–40% more than independent shops for the same job
- Front pads wear faster than rear pads and usually need replacing first, per TheHowMuch’s pricing analysis
When you get a quote, ask specifically: what brand of pads are they using, what’s the current rotor thickness, are hardware and shims included, and is there a disposal fee for the old parts? A shop that can’t answer those questions clearly is worth walking away from.
How to replace brake pads safely: a step-by-step DIY checklist
This procedure is for competent DIYers working on a standard disc-brake setup. Budget 45–90 minutes per axle depending on your experience and the vehicle.
Tools and materials you’ll need
- Floor jack and two quality jack stands (never work under a car on a jack alone)
- Lug wrench or impact driver
- C-clamp or brake piston tool (to compress the caliper piston)
- Socket set and combination wrenches
- Brake cleaner spray
- Caliper grease / anti-squeal lubricant
- New brake pads (matched to your vehicle’s spec)
- Hardware kit (clips and shims — buy these with the pads)
- Torque wrench
- Owner’s manual (for torque specs and pad type)
Step-by-step procedure
- Park on a flat, level surface. Engage the parking brake and chock the wheels you’re not working on.
- Loosen the lug nuts before lifting. Break them loose while the tire is still on the ground.
- Lift the vehicle at the manufacturer’s specified jack points. Set jack stands before going under. Never skip this.
- Remove the wheel. Set it aside flat so it can’t roll.
- Locate the caliper. It’s the clamp-like assembly straddling the rotor. Don’t let it hang by the brake hose — use a wire hook or bungee cord to support it.
- Remove the caliper bolts and slide the caliper off. Set it on the suspension arm or hang it safely.
- Slide out the old pads. Note their orientation before removing.
- Inspect the rotor surface. Look for deep grooves, scoring, or a lip at the outer edge. If you feel a ridge with your fingernail, the rotor likely needs attention.
- Compress the caliper piston using a C-clamp or piston tool. Watch the brake fluid reservoir — it may overflow as the piston retracts. Remove a small amount of fluid first if needed.
- Clean the caliper bracket with brake cleaner. Apply a thin layer of caliper grease to the metal contact points (never on the pad face or rotor).
- Install the new hardware kit, then seat the new pads into the bracket.
- Reinstall the caliper and torque the bolts to spec (consult your owner’s manual — typically 25–44 ft-lbs for most passenger cars).
- Reinstall the wheel and torque the lug nuts in a star pattern to spec.
- Before driving: pump the brake pedal repeatedly until it feels firm. The piston needs to re-seat against the new pads.
- Test drive slowly in a safe area. Confirm the pedal feels solid and the car stops straight.
Safety checklist before you call it done:
- Lug nuts torqued to spec (not just “tight”)
- Brake pedal firm before moving the car
- No fluid leaks at the caliper or brake line
- Parking brake functions normally
- Dispose of old pads at a certified auto parts recycler — brake dust contains heavy metals and should never go in household trash
When do rotors need resurfacing or replacement?
Rotors don’t last forever, and worn pads accelerate their damage. Every rotor has a minimum thickness stamped on its edge or listed in your service manual. Once a rotor wears below that spec, it can’t safely dissipate heat and must be replaced.
Symptoms that point to rotor problems:
- Pulsing or vibration through the brake pedal (warped rotor)
- Steering wheel shaking during braking
- Deep grooves or scoring visible on the rotor face
- A raised lip at the outer rotor edge you can feel with your finger
Shops measure rotor thickness with a micrometer, not by eyeballing it. A rotor that looks fine can still be below minimum spec. Resurfacing (cutting the rotor on a lathe) costs less than replacement but removes material, so it’s only viable if there’s enough thickness left. Many shops now recommend replacing rotors outright when doing a full pad job — new rotors are often only $30–$60 more than resurfacing, and you get a fresh surface matched to the new pads.
Pro Tip: If you’re replacing pads and the rotors have a noticeable lip or any deep grooves, factor rotor replacement into your budget from the start. A pads-only job on damaged rotors will squeal, wear unevenly, and likely need a redo within months.
A pads-plus-rotors job typically runs $300–$600 per axle at a shop. That’s the number to keep in mind when deciding whether to DIY or hand it to a professional.
Which brake pad material is right for your car?
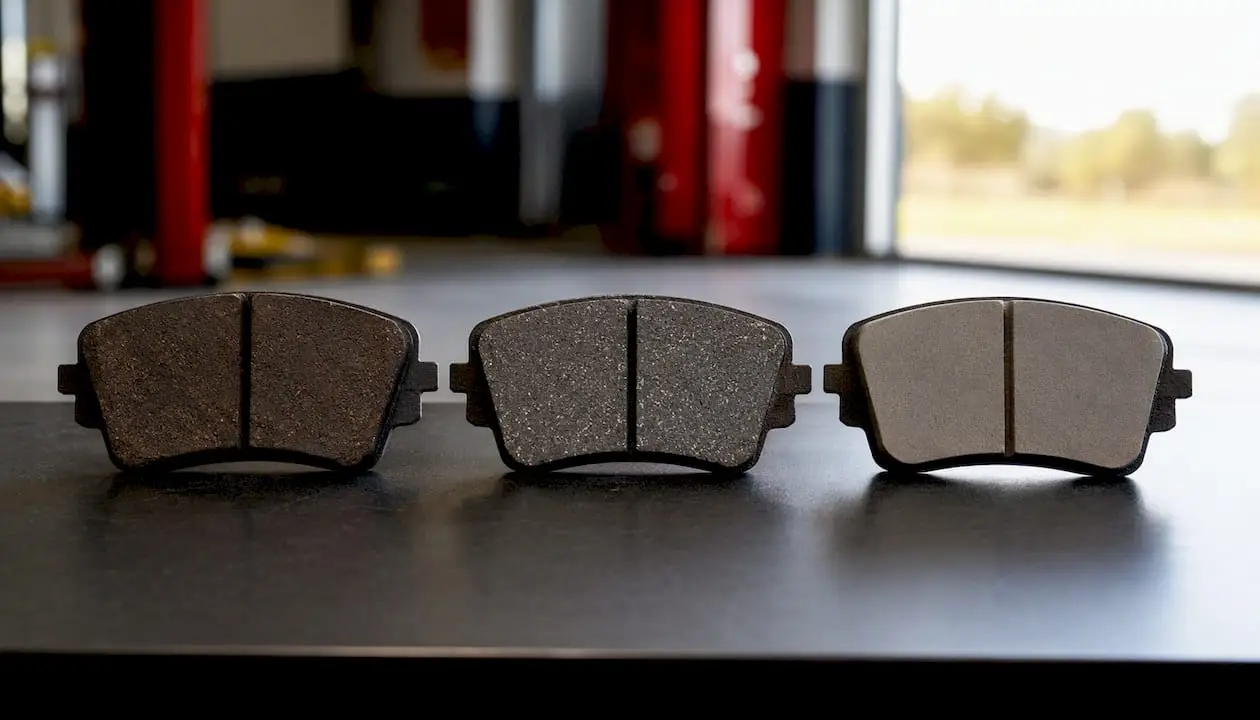
Pad material shapes everything: how long they last, how much dust they leave on your wheels, how loud they are, and how they perform under heat. Here’s how the three mainstream types stack up.
Organic pads ($25–$50/axle in parts)
Made from materials like rubber, glass, and resin. They’re quiet, gentle on rotors, and easy on the wallet. The trade-off is faster wear and poor performance under heavy heat — not ideal for mountain driving or frequent towing. Best for: light daily commuters who prioritize a quiet, budget-friendly ride.
Semi-metallic pads ($40–$70/axle in parts)
The most common choice in the U.S. They contain steel fibers for better heat dissipation and longer life than organic pads, but they run louder and produce more brake dust. They handle a wider range of driving conditions well. Best for: drivers who want durability and performance without paying ceramic prices.
Ceramic pads ($60–$120/axle in parts)
Quieter than semi-metallic, produce finer (lighter-colored) dust, and last longer. They don’t bite as hard in extreme cold, but for most daily drivers in moderate climates, they’re the premium choice. Best for: drivers who want clean wheels, low noise, and don’t mind spending a bit more upfront.
Pro Tip: Check whether your vehicle came with OEM wear sensors — small electrical clips that trigger a dashboard warning when pads wear thin. Not all aftermarket pads include compatible sensors. If yours has them, buy pads that include replacement sensors or purchase them separately. Skipping this means your warning system won’t work.
For a deeper look at how these materials perform in real-world daily driving, the brake pad comparison guide at Express Lube & Car Care breaks down the best picks by driving style.
When should you hire an ASE-certified shop instead of doing it yourself?
DIY brake work makes sense for a straightforward pads-only job on a common vehicle. But there are clear situations where handing it to a professional isn’t just convenient — it’s the safer call.
Stop and call a shop when:
- You hear metal-on-metal grinding (rotors are likely damaged)
- Your vehicle has an electronic parking brake (EPB) — these require a scan tool to retract the rear caliper piston and can’t be compressed with a standard C-clamp
- The caliper is seized, leaking, or the slide pins are corroded
- Rotor thickness is at or below minimum spec
- You find brake fluid leaking anywhere in the system
- Your ABS warning light is on alongside brake symptoms
Questions to ask any shop before you commit:
- Are your technicians ASE-certified?
- What brand of pads do you use, and are hardware kits included?
- Will you measure rotor thickness with a micrometer and show me the reading?
- What’s your warranty on brake work?
- Is there a disposal fee for old parts?
A shop that measures rotors with a micrometer rather than guessing by feel, replaces hardware with every pad job, and verifies torque specs with a calibrated wrench is doing the job right. Professional inspections also catch wear patterns and rotor issues that visual checks alone can miss, which is why ASE-certified technicians recommend inspections during every oil change or tire rotation.
On warranty: DIY brake work typically voids any remaining powertrain or brake-system warranty coverage on newer vehicles. A shop-performed job with documented parts and labor preserves that coverage and adds the shop’s own warranty on top.
Common DIY mistakes and how to fix them after the job
Even experienced home mechanics slip up on brake jobs. Here are the most common errors and what to do if something feels off after you button everything back up.
Mistakes that happen during the job:
- Not compressing the piston fully before installing new pads. The caliper won’t seat, and you’ll feel a spongy pedal immediately.
- Contaminating the pad face or rotor with grease or brake cleaner. Even a fingerprint’s worth of oil can cause glazing and squeal. Handle pads by their edges only.
- Letting the caliper hang by the brake hose. This stresses the hose and can cause internal damage that shows up as a soft pedal weeks later.
- Skipping the hardware kit. Old, corroded clips cause uneven pad contact and noise.
- Not torquing lug nuts in a star pattern. Uneven torque can warp the rotor before you’ve driven a mile.
Troubleshooting after the job:
- Squealing after installation: Pads may need bedding in, or anti-squeal shim is missing. Run the bed-in procedure before assuming a defect.
- Soft or spongy pedal: Piston wasn’t fully compressed, or air entered the system. Pump the pedal repeatedly. If it doesn’t firm up, bleed the brakes.
- Pulling to one side: One caliper may be sticking. Check that both slide pins move freely.
- Vibration under braking: Lug nuts may be unevenly torqued, or a rotor was contaminated. Re-torque the lugs and inspect the rotor surface.
The bed-in procedure: For the first 100–200 miles, make 8–10 moderate stops from about 30 mph, allowing the brakes to cool between each. This transfers a thin, even layer of pad material onto the rotor and dramatically reduces noise and vibration. For more troubleshooting guidance, the brake problem symptoms guide covers what each symptom typically points to.
What Express Lube & Car Care offers for brake-pad replacement
If you’d rather leave the brake work to someone with a torque wrench and a micrometer, Express Lube & Car Care in Arlington handles the full job with ASE-certified technicians, a digital vehicle inspection, and a 24-month/24,000-mile warranty on all repair work.
A typical brake service at Express Lube includes a full inspection of pads, rotors, calipers, and hardware; micrometer rotor measurement; pad and hardware replacement; and a post-service test drive to confirm everything feels right. You get a written estimate before any work starts, so there are no surprises on the invoice.
Pro Tip: Ask for your rotor thickness readings in writing. A reputable shop will hand them over without hesitation. Those numbers tell you exactly where your rotors stand and help you make an informed decision about resurfacing versus replacement.
Express Lube & Car Care is also a RepairPal Certified Shop and a CarFax Top-Rated Service Center, which means pricing and quality standards are independently verified. For drivers who want a professional brake job without the dealer markup, that combination of certification and warranty is hard to beat.
My honest take on DIY vs. professional brake work
The conventional wisdom says brake jobs are easy. And for a simple pads-only swap on a Honda Civic or Toyota Camry, that’s mostly true. But “easy” gets people into trouble when they skip the rotor measurement, use the wrong pad type, or discover mid-job that their rear calipers need a scan tool to compress.
My rule of thumb: DIY if it’s pads-only on a mainstream vehicle, you already own a torque wrench and jack stands, and you can follow the bed-in procedure without skipping it. Stop and call a shop the moment you see a seized caliper, a rotor with a deep groove, or any warning light you can’t explain. Brakes are the one system where “good enough” isn’t a standard worth accepting.
Keep records of every brake job, whether you do it yourself or pay a shop. Date, mileage, pad brand, rotor condition. That paper trail matters for warranty claims, resale value, and your own peace of mind the next time you hear a squeal.
Schedule your brake inspection at Express Lube & Car Care
Brake work done right shouldn’t cost a fortune or take all weekend. At Express Lube & Car Care in Arlington, TX, ASE-certified technicians handle the full job, from pad inspection to rotor measurement to test drive, backed by a 24-month/24,000-mile warranty on every repair.
Right now, you can save $20 on brake services when you book at Express Lube. If the job turns out to be bigger than a pad swap, auto repair financing is available so cost doesn’t force you to delay a safety-critical repair. Stop by or call to schedule your brake inspection today.
Sources
- Brake Pad Replacement Cost Estimate
- How Much Do Brake Pads Cost in 2026? (Parts Price by Material & Vehicle) | UseCalcPro
- Brake Pad Replacement: 5 Warning Signs & Maintenance Tips | GEICO
- Brake repair guidance and pricing | KBB
- How to Detect Signs of Worn-Out Brake Pads
- How Much Does Brake Pad Replacement Cost? Honest Pricing Guide (2026) | TheHowMuch
FAQ
How much does brake pad replacement usually cost?
Parts alone run $25–$120 per axle depending on material, while a professional installed job typically costs $150–$300 per axle at an independent shop. RepairPal’s average for a full brake pad job lands between $330 and $390 total.
What are the signs of worn brake pads?
The most common signs are a high-pitched squeal (the wear indicator doing its job), metal-on-metal grinding, longer stopping distances, pedal vibration, and the vehicle pulling to one side. Any grinding or pulling warrants immediate attention.
How often should you change brake pads?
Most brake pads’ lifespan varies depending on driving style and pad material, but the better habit is inspecting them at least twice a year or with every tire rotation. Front pads typically wear faster than rear pads and usually need replacing first.
Should you replace brake pads yourself or hire a shop?
DIY is reasonable for a pads-only job on a mainstream vehicle if you have a torque wrench, jack stands, and the confidence to follow the procedure correctly. Choose a shop when you have electronic parking brakes, caliper issues, damaged rotors, or any uncertainty about the system.